00. telnet 的使用 之前一直以为 telnet 用的是自己的协议呢,实际用起来更像是建立一个传输层连接,具体传输细节需要手打。
HTTP GET 试着模拟 curl http://www.rayalto.org ,先执行 telnet www.rayalto.org http ,效果差不多像这样:
1
2
3
4
rayalto@RayAltoXL ~$ telnet www.rayalto.org http Trying 19.19.81.0... Connected to www.rayalto.org. Escape character is '^]'.
指令最后的 http 表示想要访问 www.rayalto.org 上的 http 服务,其实是端口的别名,可以在 /etc/services 里找到。 最后一行 Escape character is '^]'. 指按 <C-]> 键可以呼出 telnet 的 shell ,比如呼出后执行 close 可以关闭连接。 然后需要手打 HTTP 请求,比如输入下面的三行:
1
2
3
GET / HTTP/1.1 Host: www.rayalto.org Connection: close
之后再输入一个空行(再按一下 <CR> )表示 HTTP 请求结束,然后就可以收到响应了,整体大概像这样:
1
2
3
4
5
6
7
8
9
10
11
12
13
14
15
16
17
18
19
20
21
22
23
24
rayalto@RayAltoXL ~$ telnet www.rayalto.org http Trying 19.19.81.0... Connected to www.rayalto.org. Escape character is '^]'. GET / HTTP/1.1 Host: www.rayalto.org Connection: close HTTP/1.1 301 Moved Permanently Server: nginx/1.18.0 Date: Fri, 27 Sep 2024 03:48:34 GMT Content-Type: text/html Content-Length: 169 Connection: close Location: https://www.rayalto.org/ <html> <head><title>301 Moved Permanently</title></head> <body> <center><h1>301 Moved Permanently</h1></center> <hr><center>nginx/1.18.0</center> </body> </html> Connection closed by foreign host.
SMTP SMTP 也可以手写,实在是太 🤓 辣,查了查网易的文档,下面展示如何借助 telnet 用网易邮箱的 SMTP 服务器发邮件给 Gmail :
网易的 SMTP 服务器是 smtp.163.com ,执行 telnet smtp.163.com smtp ,大概像这样:
1
2
3
4
5
rayalto@RayAltoXL ~$ telnet smtp.163.com smtp Trying 111.124.203.45... Connected to smtp.163.com. Escape character is '^]'. 220 163.com Anti-spam GT for Coremail System (163com[20141201])
然后输入 HELO 163.com 跟网易打个招呼(向 163.com 认证你的电脑),大概像这样:
不确定这一步的 163.com 正不正确,甚至不确定这一步有没有必要。
然后网易邮箱需要认证登陆,输入 AUTH LOGIN :
1 2 AUTH LOGIN 334 dXNlcm5hbWU6
返回的 dXNlcm5hbWU6 是 Base64 编码的 username: ,需要回复用户名,比如 foobar@163.com 的用户名就是 foobar ,回复也需要是 Base64 编码的,可以借助 openssl :
1 2 rayalto@RayAltoXL ~$ echo -n 'foobar' | openssl enc -e -base64 Zm9vYmFy
得到 Zm9vYmFy 输进去:
1 2 Zm9vYmFy 334 UGFzc3dvcmQ6
返回的 UGFzc3dvcmQ6 是 Base64 编码的 Password: (不知道为啥 username 没大写而 Password 却首字母大写了),输入 Base64 编码的 SMTP 密钥:
1 2 5LyK5ZC55Y+v54ix5ru05o2P 235 Authentication successful
登陆完成了,然后输入 MAIL FROM: <foobar@163.com> 设置发信人,注意 < 和 > 不可以省略:
1 2 MAIL FROM: <foobar@163.com> 250 Mail OK
输入 RCPT TO: <foobar@gmail.com> 设置收信人, < 和 > 也不可以省略:
1 2 RCPT TO: <foobar@gmail.com> 250 Mail OK
输入 DATA 之后就可以写邮件内容了:
1 2 DATA 354 End data with <CR><LF>.<CR><LF>
意思是 . 作为一行表示邮件内容结束,比如我输入这几行:
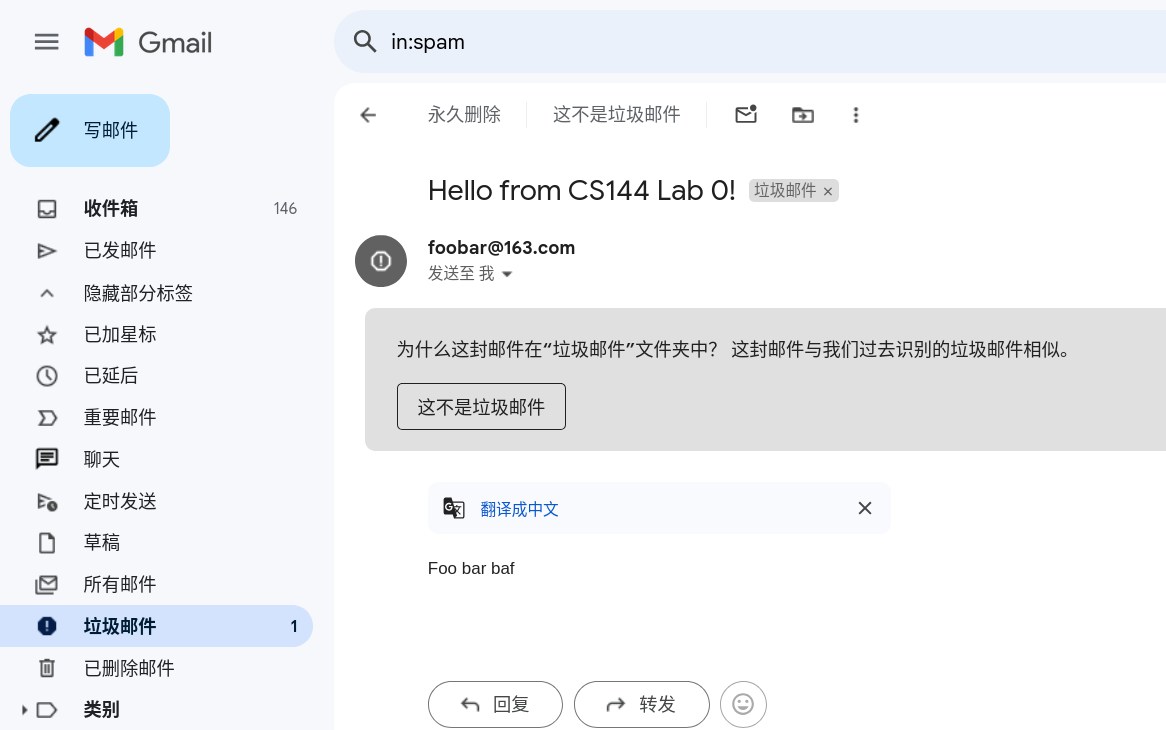
1 2 3 4 5 6 From: foobar@163.com To: foobar@gmail.com Subject: Hello from CS144 Lab 0! Foo bar baf! .
注意标头和正文之间需要空一行,成功时的回复像这样:
1 250 Mail OK queued as gzsmtp1,5LyK5ZC55Y+v54ix5ru05o2P--.114514 1919810
然后执行 QUIT 告诉网易邮箱关闭连接:
1 2 3 QUIT 221 Bye Connection closed by foreign host.
完整过程像这样:
1 2 3 4 5 6 7 8 9 10 11 12 13 14 15 16 17 18 19 20 21 22 23 24 25 26 27 28 29 rayalto@RayAltoXL ~$ telnet smtp.163.com smtp Trying 111.124.203.45... Connected to smtp.163.com. Escape character is '^]'. 220 163.com Anti-spam GT for Coremail System (163com[20141201]) HELO 163.com 250 OK AUTH LOGIN 334 dXNlcm5hbWU6 Zm9vYmFy 334 UGFzc3dvcmQ6 5LyK5ZC55Y+v54ix5ru05o2P 235 Authentication successful MAIL FROM: <foobar@163.com> 250 Mail OK RCPT TO: <foobar@gmail.com> 250 Mail OK DATA 354 End data with <CR><LF>.<CR><LF> From: foobar@163.com To: foobar@gmail.com Subject: Hello from CS144 Lab 0! Foo bar baf . 250 Mail OK queued as gzsmtp1,5LyK5ZC55Y+v54ix5ru05o2P--.114514 1919810 QUIT 221 Bye Connection closed by foreign host.
然后就可以在 Gmail 的垃圾邮件里找到刚刚发的邮件了:
01. netcat 这里用的是 openbsd-netcat ,让 netcat 监听 9090 :
然后再用 telnet 连接:
两边就可以双向通信了。
其实 telnet 那里也可以用 netcat , nc -N localhost 9090 也可以达成同样的效果。
02. 实现 webget 先 git clone https://github.com/CS144/minnow.git ,编辑 ./apps/webget.cc 完成 get_URL 方法:
1 2 3 4 5 6 7 8 9 10 11 12 string buf; TCPSocket s; s.connect ( { host, "http" } ); s.write ( "GET " + path + " HTTP/1.1\r\n" ); s.write ( "HOST: " + host + "\r\n" ); s.write ( "Connection: close\r\n" ); s.write ( "\r\n" ); while ( !s.eof () ) { s.read ( buf ); cout << buf; } s.close ();
它这个 clang-format 调的我生理不适
03. 实现内存上的可靠字节流 就是完成 minnow 的 src/byte_stream.{hh,cc} ,我的答案(他们的 clang-format 真的辣眼睛):
在 class ByteStream 的 protected 下加上这些成员:
1 2 3 4 std::string buf_; uint64_t nreads_ {};uint64_t nwrites_ {};bool closed_ {};
初始化列表初始化 buf_ :
1 ByteStream::ByteStream ( uint64_t capacity ) : capacity_ ( capacity ), buf_ ( capacity_, '\0' ) {}
各成员函数定义:
1 2 3 4 5 6 7 8 9 10 11 12 13 14 15 16 17 18 19 20 21 22 23 24 25 26 27 28 29 30 31 32 33 34 35 36 37 38 39 40 41 42 43 44 45 46 47 48 49 50 51 52 53 54 55 56 57 58 59 60 61 62 63 64 65 66 67 68 69 70 71 bool Writer::is_closed () const return closed_; } void Writer::push ( string data ) if ( is_closed () ) { return ; } size_t data_len = data.length (); const uint64_t avai_cap = available_capacity (); if ( data_len == 0 || avai_cap == 0 ) { return ; } string_view d { data }; if ( data_len > avai_cap ) { d = d.substr ( avai_cap ); data_len = avai_cap; } const size_t cursor = nwrites_ % capacity_; const size_t len_left = capacity_ - cursor; if ( data_len > len_left ) { buf_.replace ( cursor, len_left, data, 0 , len_left ); buf_.replace ( 0 , data_len - len_left, data, len_left, data_len - len_left ); } else { buf_.replace ( cursor, data_len, data, 0 , data_len ); } nwrites_ += data_len; return ; } void Writer::close () closed_ = true ; } uint64_t Writer::available_capacity () const return ( capacity_ - ( nwrites_ - nreads_ ) ); } uint64_t Writer::bytes_pushed () const return nwrites_; } bool Reader::is_finished () const return closed_ && bytes_buffered () == 0 ; } uint64_t Reader::bytes_popped () const return nreads_; } string_view Reader::peek () const return string_view { buf_ }.substr ( nreads_ % capacity_, bytes_buffered () ); } void Reader::pop ( uint64_t len ) nreads_ += len; } uint64_t Reader::bytes_buffered () const return ( nwrites_ - nreads_ ); }
我的测试结果:
1 2 3 4 5 6 7 8 9 10 11 12 13 14 15 16 17 18 19 20 21 22 23 24 25 26 27 28 29 rayalto@RayAltoXL ~/Projects/cpp/minnow$ cmake --build ./build --target check0 Test project /home/rayalto/Projects/cpp/minnow/build Connected to MAKE jobserver Start 1: compile with bug-checkers 1/10 Test #1: compile with bug-checkers ........ Passed 0.20 sec Start 2: t_webget 2/10 Test #2: t_webget ......................... Passed 1.59 sec Start 3: byte_stream_basics 3/10 Test #3: byte_stream_basics ............... Passed 0.01 sec Start 4: byte_stream_capacity 4/10 Test #4: byte_stream_capacity ............. Passed 0.01 sec Start 5: byte_stream_one_write 5/10 Test #5: byte_stream_one_write ............ Passed 0.01 sec Start 6: byte_stream_two_writes 6/10 Test #6: byte_stream_two_writes ........... Passed 0.01 sec Start 7: byte_stream_many_writes 7/10 Test #7: byte_stream_many_writes .......... Passed 0.05 sec Start 8: byte_stream_stress_test 8/10 Test #8: byte_stream_stress_test .......... Passed 0.03 sec Start 37: compile with optimization 9/10 Test #37: compile with optimization ........ Passed 0.11 sec Start 38: byte_stream_speed_test ByteStream throughput: 18.27 Gbit/s 10/10 Test #38: byte_stream_speed_test ........... Passed 0.18 sec 100% tests passed, 0 tests failed out of 10 Total Test time (real) = 2.21 sec Built target check0